
“(If yes, then the solution is given below for you.)”
The Wooden Acoustic Panel System with ecotone Sound Insulation Pad offers a complete soundproofing and acoustic treatment solution for homes, studios, offices, and theaters.
Top Reasons to Use This Product
1. 🔇 Superior Soundproofing Performance
- The SoundBlanket MLV 3mm and MMT Acoustic Pads significantly reduce airborne noise, vibrations, and echo.
- Ideal for recording rooms, home theaters, meeting rooms, or residential privacy.
2. 🎶 Improves Acoustic Quality
- The Wooden Acoustic Panels absorb mid and high-frequency sounds, ensuring clear, natural audio quality.
3. 🛠️ Modular & Easy Installation
- Designed with a steel frame and insert system for secure and repeatable installation.
- No messy glue or complicated tools needed — perfect for interior professionals.
4. 🔥 Fire-Resistant & Safe Materials
- Uses non-combustible, certified acoustic materials.
- Safe for commercial, industrial, and home use
5. 🧱 Strong & Long-Lasting Structure
- The steel framing and auxiliary keels provide high durability.
- Resistant to humidity, warping, and long-term wear.
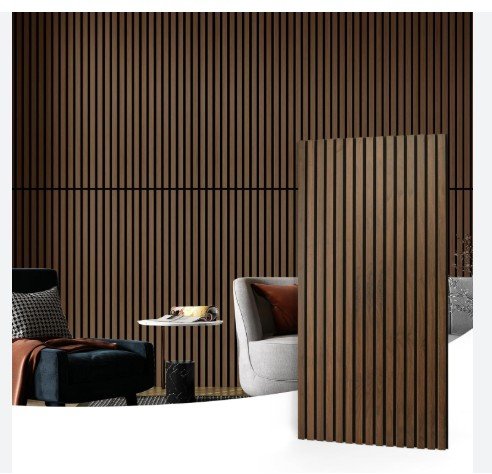
6. 🎨 Aesthetic & Customizable Design
- Wooden panels come in multiple colors and finishes.
- Match your modern or traditional interior effortlessly.
7. 🌱 Eco-Friendly Construction
- Made from environmentally safe, recyclable components.
- No harmful chemicals or heavy VOC emissions.
📌 Conclusion:
The Wooden Acoustic Panel with MMT Insulation System is the perfect choice if you want:
- Peaceful interiors
- Professional sound quality
- Stylish acoustic walls
- Easy and safe installation
“Now, understand how to install it.”
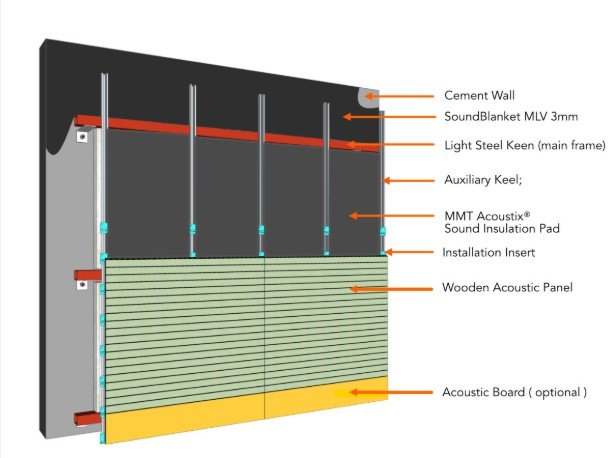
🔹 Part 1: Cement Wall Preparation
Step 1 – Surface Cleaning & Check
- Ensure the brick mas with plaster wall is flat, dry, and dust-free.
- Remove any loose particles or paint for proper bonding.
🔹 Part 2: Sound Blanket MLV 3mm Fixing
Step 2 – MLV Application
- Attach SoundBlanket MLV 3mm directly to the cement wall using adhesives or fasteners.
- Overlap seams by 2 inches and seal with acoustic tape.
Part 3: Light Steel Keen Frame Installation
Step 3 – Main Frame Setup
- Fix Light Steel Keens (main frame) vertically at regular intervals.
- Use screws or anchors suitable for concrete wall support.
Part 4: Auxiliary Keel Attachment
Step 4 – Keel Support Grid
- Install auxiliary keels horizontally over the steel keens.
- These support the weight of the panel and maintain structural integrity.
Part 5: Ecotone Sound Insulation Pad Installation
Step 5 – Padding for Acoustic Insulation
- Place Ecotone sound insulation pads inside the grid.
- These pads block airborne sound and reduce echo.
Part 6: Installation Insert Fixing
Step 6 – Insert Clips or Support Anchors
- Fix installation inserts to hold panels securely in place.
- Ensure spacing matches panel size for a snug fit.
Part 7: Ecotone Wooden Acoustic Panel Mounting
Step 7 – Panel Placement
- Carefully mount wooden acoustic panels on the installation inserts.
- Press firmly for proper alignment and support.
Optional: Acoustic Board (Bottom Layer)
Step 8 – Add Optional Layer
- Fix acoustic board at the bottom (if extra insulation needed).
- This layer adds bass absorption and enhances aesthetics.
Final Tips for Acoustic Panel Installation
- Always measure your wall dimensions before purchasing material.
- Use certified acoustic materials for better results.
- Maintain a gap between wall and panels if air cavity insulation is desired.
👉 Recommended for:
✅ Home Theaters
✅ Recording Studios
✅ Conference Rooms
✅ Hotels & Luxury Spaces
✅ Schools & Auditoriums
📏 1. Standard Sizes (mm):
| Panel Size | Dimensions |
|---|---|
| 2 ft x 8 ft | 600mm x 2400mm |
| 1 ft x 8 ft | 300mm x 2400mm |
| 4 ft x 8 ft (rare) | 1220mm x 2400mm (custom/big walls) |
| Height | Customizable (cuttable) |
📐 2. Thickness:
| Layer | Thickness |
|---|---|
| Front Slat (MDF/ply) | 12mm – 15mm |
| Felt Backing (Polyester) | 9mm – 12mm |
| Total Panel Thickness | ~21mm – 27mm |
Higher thickness = better sound absorption and premium look.
🎨 3. Popular Color Options:
| Finish Name | Shade Type | Looks Like |
|---|---|---|
| Natural Oak | Light wood | Elegant, modern |
| Walnut | Medium brown | Rich, classy |
| Black Ash | Deep black wood grain | Luxury / Studio |
| Teakwood | Warm orange-brown | Indian interiors |
| Wenge | Dark chocolate | Bold interiors |
| Grey Oak | Grey with wood grains | Contemporary |
| White Washed Oak | Light white tint on wood | Scandinavian look |
| Custom Duco Paint | Any shade (RAL/NCS) | Smooth matte finish |
4. Material Options:
- Slats: MDF, HDF, or Natural Veneer on plywood.
- Backing: 9–12mm Polyester Felt Sheet (Black or Grey standard).
- Fire-retardant and moisture-resistant options available.
🧩 5. Slat Design (Groove):
| Slat Width | Groove Width | Look |
|---|---|---|
| 27mm slat + 13mm groove | Modern, standard | |
| 15mm slat + 15mm groove | Finer detailing | |
| 40mm slat + 20mm groove | Heavy wood look |